Driving the Yeti Build Agent from Claude Code: A Step-by-Step Walkthrough
How to wire the SnowCoder Yeti Build Agent into Claude Code over MCP, kick off a 291-story benchmark, and ship Fluent SDK output without leaving the terminal.
Why Run the Yeti Build Agent from Claude Code
Most ServiceNow developers spend their day in a Studio tab, a Service Portal preview, and an IDE. Claude Code adds a fourth surface that ties the others together: a terminal-native agent that can read your repo, drive your tools, and talk to remote MCP servers. SnowCoder MCP exposes the Yeti Build Agent as one of those remote servers, so a Claude Code session can plan a story, hand it to the Yeti Build Agent, watch the run, and commit the result.
That is a real shortening of the inner loop. Instead of switching between the SnowCoder console and your editor, you stay in Claude Code, ask it to drive the Yeti Build Agent, and inspect the per-AC translation diffs the same way you would inspect a pull request.
The Yeti Build Agent is an Enterprise-tier capability. MCP is on every tier. So Claude Code can drive it on any account that has Enterprise enabled.
Step 1: Register SnowCoder MCP with Claude Code
Claude Code reads MCP servers from a configuration file. Add the SnowCoder remote server to your ~/.config/claude-code/mcp.json:
{
  "mcpServers": {
    "snowcoder": {
      "url": "https://mcp.snowcoder.ai",
      "transport": "http",
      "auth": {
        "type": "oauth2.1",
        "pkce": "S256",
        "clientRegistration": "dynamic",
        "scopes": [
          "mcp:read",
          "mcp:write",
          "projects:read",
          "projects:write",
          "builds:read",
          "builds:write"
        ]
      }
    }
  }
}
The auth block triggers OAuth 2.1 with PKCE (S256) and Dynamic Client Registration under RFC 7591. You will not paste API keys. Claude Code will open a browser tab on first use, you will sign in to SnowCoder, and refresh-token rotation handles renewal from then on.
Step 2: Connect and Verify
Open a Claude Code session in your project directory and ask it to confirm the connection:
# In your Claude Code session
> /mcp connect snowcoder
> List the tools the snowcoder server exposes.
You should see a tool list that includes projects.create, builds.start, builds.status, builds.diffs, and a handful of read-only KB tools backed by the 100,000+ vector ServiceNow knowledge base. If you only see the read tools, your scopes are wrong; re-check the config.
The first time any tool is called, Claude Code will surface the consent screen for the requested scopes. Approve them once and the refresh token handles future calls.
Step 3: Create a Project and Load Stories
The Yeti Build Agent works at the project level. A project is a named bundle of stories, an instance target, and a HealBudget configuration. Create one from Claude Code:
> Use snowcoder.projects.create to create a project named
> "vip-incident-routing" targeting instance dev92841 with
> healBudget.cap = 2.50 and maxAttempts = 5.
Then load stories from a local file. Claude Code can read your repo directly, so a backlog stored as YAML or Markdown is fine. Ask it to parse the file and post each story via projects.addStory. Each story should carry one or more acceptance criteria; per-AC diffs are recorded against those IDs later.
> Read backlog/vip-stories.yaml and add each story to the
> vip-incident-routing project. Use the AC IDs from the file
> as-is. Confirm count when done.
Step 4: Start the Build
With stories loaded, kick off the Yeti Build Agent. A typical first call:
> Start a build for vip-incident-routing. Use the full backlog,
> enable auto-heal, target dev92841, and stream status back to me.
Under the hood, Claude Code calls builds.start and then polls builds.status. The Yeti Build Agent generates Fluent SDK code for each story, drawing from the 42 supported artifact classes. Each AC produces a translation, deploys to the instance, and runs validation. Failures feed the heal loop, capped at 5 attempts per story and at the HealBudget per-story spend.
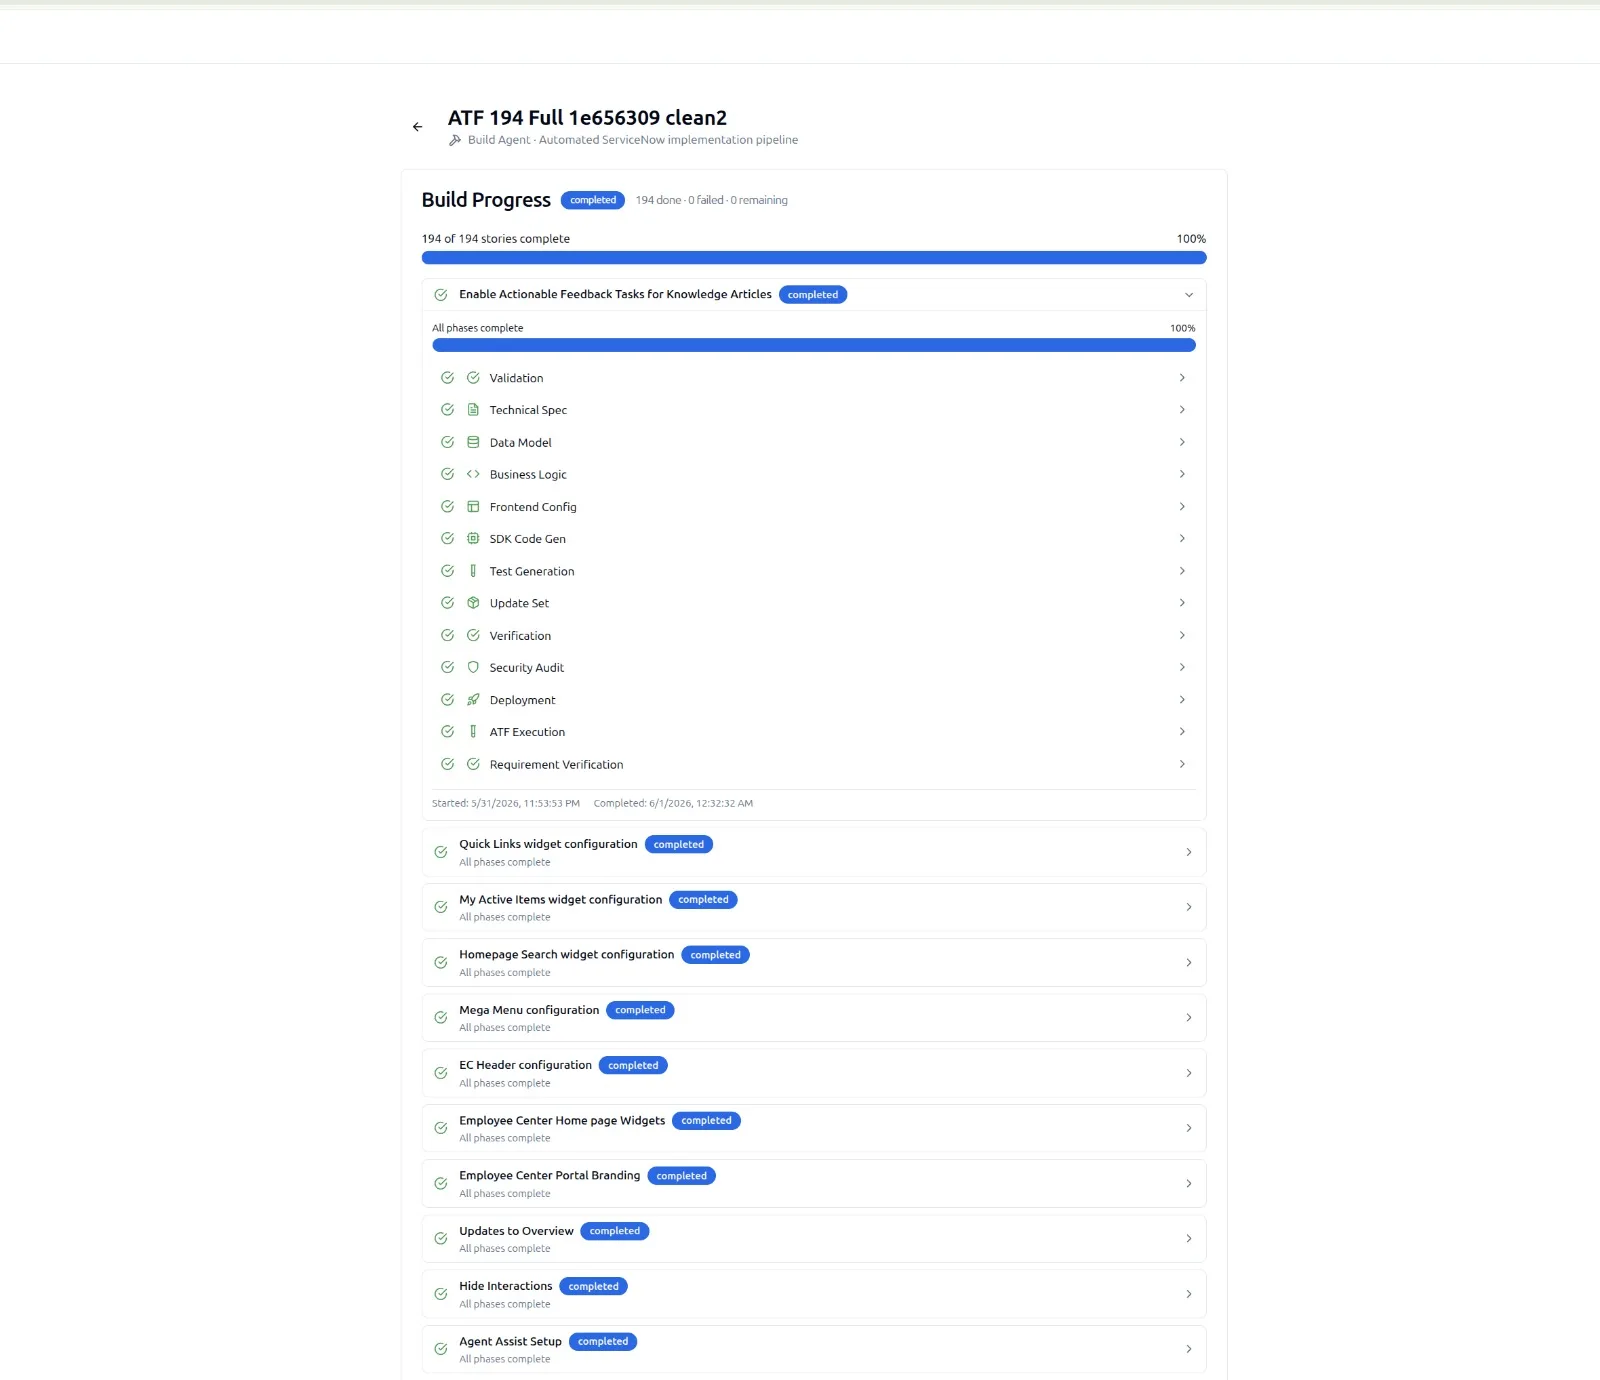
The status stream returns counts of passed, failed, healing, and budget-exceeded stories in near real time. Claude Code surfaces them as table updates so you can stop the build if something looks off.
Step 5: Inspect Per-AC Diffs
When the build finishes, the most useful artifact is not the pass/fail count. It is the per-AC diff set. Each AC has a record showing the input text, the Fluent SDK statements generated, validation result, and any heal attempts.
> Fetch builds.diffs for the latest run on vip-incident-routing.
> Filter to ACs with heal_attempts > 0. Summarize the root
> cause hints for each.
This is where Claude Code earns its keep. It can ingest the diff JSON, group failures by cause, and ask you whether to amend the AC text or accept the healed result. The summary is the input for the next iteration of the backlog.
Step 6: Commit and Promote
The Yeti Build Agent stores Fluent SDK output in the project. To pull it down to your repo, ask Claude Code to fetch the artifact bundle and write it into your project layout:
> Fetch the latest passed-artifact bundle for vip-incident-routing.
> Write each artifact into src/sn/<scope>/<class>/ following the
> existing repo structure. Open a git diff when done.
Because Claude Code runs locally with your git credentials, the next step is straightforward. Stage, write a commit message based on the per-AC diff summary, and push. The CI side then picks up the change and promotes to the next instance through your existing pipeline.
One thing worth noting: SnowCoder MCP scopes are granular for a reason. builds:write lets Claude Code start and cancel builds. projects:write lets it edit project metadata. Neither one grants permission to alter your ServiceNow instance directly. The Yeti Build Agent does that, and only the Yeti Build Agent does that, under credentials configured at the project level.
Useful Patterns Beyond the First Run
Once you have the basic flow working, three patterns tend to emerge in Claude Code sessions that drive the Yeti Build Agent regularly:
- Story drafting with KB lookups. Ask Claude Code to draft a story, validate AC clarity against the 17,000+ code examples, and only then submit it.
- Pre-flight cost estimates. Use
builds.estimateto forecast spend before kicking off, especially on backlogs of 50+ stories. - Diff-driven retros. Pull per-AC diffs from the last three runs, ask Claude Code to find recurring root cause hints, and propose AC rewrites.
None of these require leaving the terminal. That is the point.
When Things Go Sideways
A few common stumbles to watch for:
- Token scope drift. If new tools appear unavailable, check whether your client registration included the right scopes. Refresh-token rotation does not widen scope.
- Instance unreachable. The Yeti Build Agent validates against a live instance. If the target is offline, builds will hold rather than fail spuriously.
- HealBudget exceedances clustering. If many stories cap out, the issue is usually AC ambiguity, not the model. Use Claude Code to summarize and rewrite.
Related reading
- SnowCoder MCP details OAuth 2.1, PKCE, and supported clients.
- Yeti Build Agent covers Fluent SDK output and the heal loop.
- SnowCoder MCP in Cursor applies the same pattern to a different IDE.
Drive the Yeti Build Agent from your terminal.
MCP is on every tier. Add SnowCoder to Claude Code in a minute, or talk to us about Enterprise Yeti Build Agent access.